This EasyStep will tell you how install SPLat/PC, our programming tool set (IDE), and start using it to interact with the EC1
- If you have not already done so, download the latest SPLat/PC (build 245 or later), and install it.
Don't run SPLat/PC yet. - Are you running Windows 8.x? Then you'll also need to download the USB information file.
Extract the files from the archive, the right-click the splat_serial.inf file and select Install. - Wire the EC1 to a USB port on your computer. You will need a USB Mini-B cable.

"Out of the box" the EC1 will have a LED flashing program, so at this stage you should see a flashing LED. If there is no flashing light it means either that the EC1 has already been reprogrammed by someone else, or that something is broken. Re-check your connections, test the USB port with something else on that needs power from the port, try a different cable, try a different port, try a different computer, etc. - (Skip if you already installed the USB drivers). The computer should inform you that it is installing USB drivers, and pop up a window like this one in Windows 8.1:

- (Skip if you already installed the USB drivers). Leave it to sort itself out. It has to go online to find the right drivers. After a while it should display a message like this one:
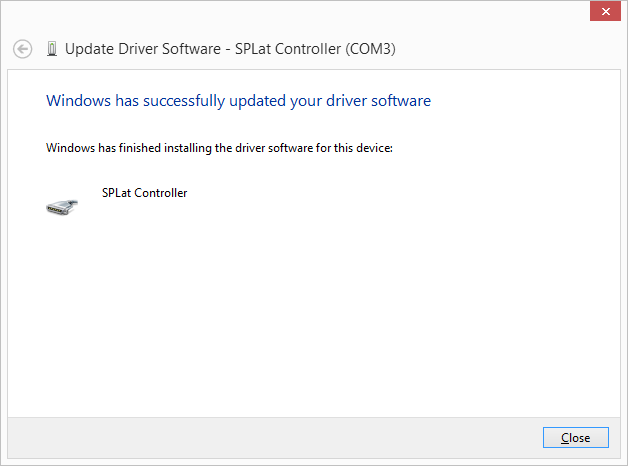
This confirms that the USB driver has been correctly downloaded and installed. You will probably get a different COM number. - Launch SPLat/PC. You will get an Edit window, a bit like NotePad, and very possibly several other windows.
- In the Edit window make the menu selection Window > Module.
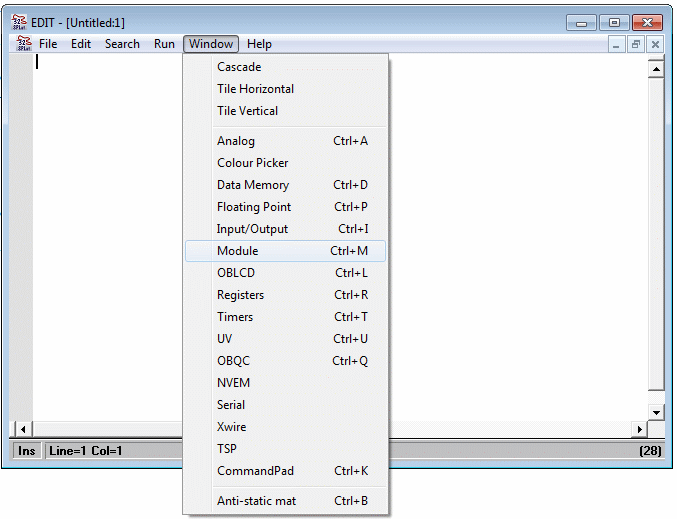
- You should see a window like this. If it fails to appear, repeat the menu selection Window > Module
or simply type CTRL+M.
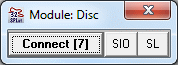
The number will most likely be quite different. - Hold down the SHIFT key and click the Connect [--] button. This should bring up a window like this:
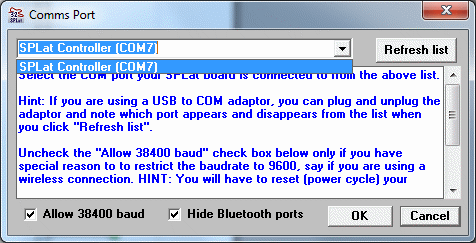
The drop-down list at the top should contain "SPLat Controller", with the same COM number as was reported when the USB driver installed. If it doesn't, unplug and re-plug it in, then click the Refresh List button. - Select your board ("SPLat Controller"). Click OK. This will take you back to the Module window.
- What do you do if you can't see your controller? DON'T PANIC.
- Download the USB information file and unzip it on your PC.
- Which version of Windows do you have?
- In Windows 7 or Vista, click on the Start Menu and type "Device Manager", then press Enter.
- In Windows 8 or 8.1, press Win+X to show the "Power User Menu", then click Device Manager.
- Or, in the Run prompt, type devmgmt.msc OR
In Control Panel select System OR
Right-click My Computer and select Properties | Hardware | Device Manager.
- Look for the Other Devices section and find SPLat Serial in there, eg:
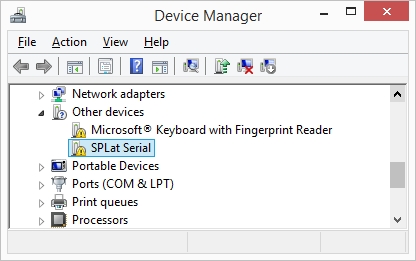
- Right-click SPLat Serial and select Update Driver Software.
- Choose Browse my computer for driver software and navigate to the place where you extracted the zip file above.
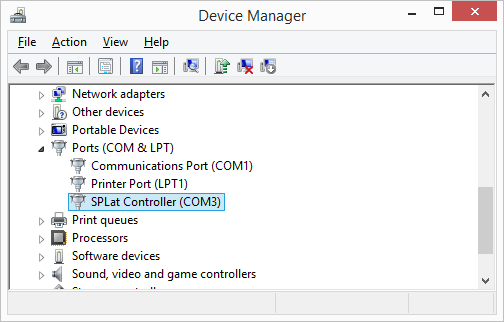
- Windows will install the driver and you will see a happy Device Manager
- Click the Connect button on the Module window. The module window should open up and look like this:
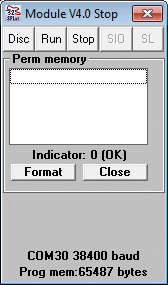
- Make sure the Module window stays open, like the image above.
The LED on the EC1 should stop flashing, because you have just stopped the program that was running in the board.
If the Module window starts flashing a red indicator and then shrinks down again, something is wrong.
In that case please go back to the top and repeat all steps.
Otherwise .... (drum roll) ...
Congratulations, the hard part is done and the fun part can begin!
Special note regarding SPLat/PC for previous customers
The EC1 does not appear in SPLat/PC's dropdown list of controllers. Don't let this confuse you. The reason is that we are migrating from having the board just report its type, e.g. MMi202, to a more flexible system where the board reports its detailed I/O config. This is because we plan to enhance the EC1 in future firmware releases so I/O pins can be re-configured dynamically. On older products that was not going to happen, because the I/O always goes through interface circuitry that locks in the functionality. With the EC1 the board pins connect directly to the chip, so we have a different (and huge) range of possibilities.
- Type CTRL+I once or twice, to get the I/O window, which should look like this:
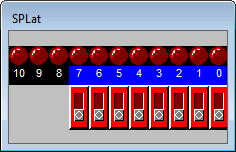
The LEDs at the top represent the digital outputs of the EC1. The tiny switches represent the digital inputs. You can see from this that the EC1 has 11 outputs and 8 inputs. - Push the button switch on the EC1, and notice the response on the I/O window. The push button is on input 0.
- Click the LED 0 on the I/O window, and watch the effect on the EC1. Output 0 drives the green LED
- Confirm that output 1 drives the red LED
- Check what happens if you click one of the outputs while holding down the SHIFT key
- Click the Run button on the Module window. This will restart the program in the EC1.
Can you see how the I/O window in SPLat/PC is a useful tool for checking out the wiring and basic functions of whatever the EC1 is controlling?
That's the end of this EasyStep. You now have the basics of connecting to your EC1 from SPLat/PC.